Thursday, February 28, 2013

Wednesday, February 27, 2013
Not able to Delete a file located in a CIFS share
This is due to that particular file might have locked...
First find the lock stat
Nayab> lock status -p cifs
Drilled down on it and ran this on the host IP:
Nayab> lock status -h <ip address>
Now break the lock
Nayab>lock break -h <ip address> -p cifs
Verify if it is unlocked
Nayab> lock status -h <ip address>
For Example :-
For Example :-
First Run this :
Nayab> lock status -f "/vol/nasvol1/nasshare1/file1.doc" -p cifs
And got this back:
========1237903r5:015b50dc
CIFS path=\nasvol1\nasshare1\file1.doc(/vol/nasvol1/nasshare1/file1.doc) host=xxx.xxx.xxx.xxx(pc-name) owner=nayabsk state=GRANTED mode=Read-denyW oplock=None
If I run this, I can then break the lock:
Nayab> lock break -f "/vol/nasvol1/nasshare1/file1.doc" -p cifs
Please refer to the below link as well
http://a2alpha.webnode.com/news/cifs-share-locked-files-on-a-netapp-filer/
Tuesday, February 26, 2013
Netapp Command to enable storage failover between HA-Pairs
FAS01> storage failover modify -node * -enabled true
Friday, February 22, 2013
Netapp Cost Calculation

Wanna know cost to setup your storage check this out at the below link
http://www.itcalc.com/
Tuesday, February 19, 2013


Before Re-sizing Netapp Snap Mirrored Volume
One Cannot resize the mirrored volume (read-only), You need to break the mirror relation to re-size a volume.
Below is the procedure how we perform the resize
FAS01 in Site A, to a FAS02 in Site B
1) Break the mirror on FAS02 in Site B
2) Resize the volume of FAS01 in Site A
3) Resize the FAS02 in Site B backup Volume with same size of volume FAS01 in Site A primary volume
(You can keep the destination much higher in space.)
4) Backup volume FAS02 in Site B should be in offline mode
5) Now Intialize the sanpmirror on FAS02 in SiteB
Done :)
How FAST a TAPE DRIVE based on its type
The answer to this is determined by multiplying the native data rate of the tape drive by the compression ratio of the data being backed up. For example, 2:1 compressible data on an HP Ultrium 460 (30 MB/sec native) should achieve a data rate of 60 MB/sec.
Note that the internal pipeline of the tape drive might limit the ultimate data rate. In the case of the HP Ultrium 460, this is around 90 MB/sec. This is unlikely to be a limiter except in the fastest of systems.

Difference between RAID LEVELS to Choose yourself what RAID will be needed by your environment
Have confusion in choosing RAID LEVEL, Have a look at the below table.


Thursday, February 14, 2013
Setting Up Mail Server on CENT OS
1. Install packages
Three packages are required for this. Install them if you haven't done yet.
$yum install sendmail
$yum install sendmail-cf
$yum install dovecot
The role of sendmail is to receive emails destined to you and keep them in your mailbox on email server. Then, dovecot actually delivers those emails to your PC when you open Thunderbird or Microsoft Outlook. For outgoing email, Thunderbird first contacts sendmail, then sendmail relays the email to final destination for you.
2. Configure sendmail
You just need to change 2 lines in configuration file /etc/mail/sendmail.mc
Comment out this to allow receiving email from anywhere.
dnl DAEMON_OPTIONS(`Port=smtp,Addr=127.0.0.1, Name=MTA')dnl
Add this line
FEATURE(`relay_hosts_only')dnl
Add your PC's full hostname in this file. Create one if this file doesn't exist.
/etc/mail/relay-domains.m4
After changing configuration file, run this command to activate it.
$/etc/mail/make
$service sendmail start
3. Configure dovecot
You just need to edit two files.
In /etc/dovecot/dovecot.conf, just edit these two lines
protocols = imap
listen = *, ::
In /etc/dovecot/dovecot.d/10-mail.conf, edit these 3 lines
mail_location = mbox:~/mail:INBOX=/var/mail/%u
mail_privileged_group = mail
mbox_write_locks = dotlock fcntl
Start dovecot service
$service dovecot start
4. (Optional) Reconfigure iptables only if you are already using iptables
Add these 2 lines into /etc/sysconfig/iptables to allow email to go through firewalls.
-A INPUT -m state --state NEW -m tcp -p tcp --dport 25 -j ACCEPT
-A INPUT -m state --state NEW -m tcp -p tcp --dport 993 -j ACCEPT
then, restart iptables by
$service iptables restart
DONE
Wednesday, February 13, 2013
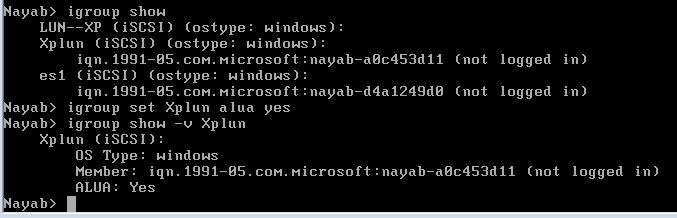
What is ALUA and how to enabe ALUA in Netapp
ALUA is an acronym that stands for "Asymmetric Logical Unit Access". For SANs, typically there are many paths from your servers to your storage - this is OK because you don't want any single point of failure. However, it's a problem if you have two storage controllers/servers that can access the same disk/LUN. Without ALUA your servers might take a non-optimal path to get to the LUNS.
ALUA was designed to solve this problem by making the client/initiator aware of the different paths, and to automatically choose the optimal path (AKA "Primary" path in the illustration above). The non-optimal/non-primary paths will still be available, but will only be used if the primary path becomes unavailable. If you aren't using ALUA and your hosts are using non-optimal paths, you may experience increased latency / reduced performance
Enabling ALUA
Netapp NDMP copy
To initiate copying volume data enable NDMP daemon.
FAS01>ndmpd on
FAS01>ndmpcopy-sa root: password-da root: password filer01 :/ vol/vol1/share1/tree1 / filer02 :/ vol/vol2/share2/tree2
where-sa root: password, respectively, the name and password for root source filer01,-da - at destination filer0, and then copy the path specified for the source and destination.The copying will get started.
If you want to copy within the filer then....
FAS01> ndmpcopy / vol/vol0/source_path / vol/vol0/destination_path
Monday, February 11, 2013

Command to check how much of space you have saved using Netapp Deduplication.
The output looks like this:
Nayab> df -s-g
Filesystem Used Saved % Saved
/ vol/vol1 / 1279GB 668GB 34%
/ vol/vol2 / 1462GB 239GB 14%
/ vol/vol3 / 1133GB 270GB 19%

Command to check Brocade Serial Number
SAN Switch:admin> chassisShow
CHASSIS/WWN Unit: 1 (in same assembly as WWN Unit: 2)
Header Version: 2
Power Consume Factor: -3
Factory Part Num: 10-0312101-03
Factory Serial Num: LV060011893
Manufacture: Day: 21 Month: 10 Year: 2009
Update: Day: 21 Month: 3 Year: 2011
Time Alive: 558 daysTime Awake: 46 days
ID: BRD0000CE
Part Num: SLKWRM000048K
Serial Num: USG876786AS -------------------------------------------> SERIAL NUMBER
Friday, February 8, 2013
How to Import Cleaning Tapes in to tape library
Importing
Cleaning Tapes
1. From the front panel, select Action.
2. Select I/E by clicking
on the down button once (I/E will be highlighted).
3. Select Unlock I/E Station (it
will already be highlighted).
You’ll see this message:
Unlocking I/E
Station
In progress,
please wait
At the next screen, you’ll see:
I/E Station is
unlocked
waiting for the
magazine to be
removed to the
I/E station
4. Open the I/E door.
5. Insert cleaning tape(s) with
any valid barcode into the I/E slot(s) of the library.
6. Shut the I/E door.
The picker will teach and scan
the I/E slots for any changes.
When the scan is complete, you’ll
see:
Select partition
assignment of
Unassigned
I/E/media
System
Library
7. Select System.

Netapp Metro Cluster DR Test
Metro
Cluster Disaster Recovery Test
|
Description
|
To test
Disaster Recovery, you must restrict access to the disaster site node to
prevent the node from resuming service. If you do not, you risk the
possibility of data corruption.
|
|
Failover
Procedure
|
1. Stop
ISL connections between sites.
Switch-Site-01and Switch-Site-02 are located in disaster site, where filer FilerA is located. Network to login to the above switches and need to disable the ISL ports. Note: Once ISL is stopped then automatic failover capability is disabled. The filer FilerB cannot takeover FilerA filer.
2. Once
the ISL is stopped then issue the below command on filer FilerB and see the
disk of FilerA in failed state. The same can be executed on FilerA filer as
well.
FilerB> aggr status -r Aggregate aggr0 (online, raid_dp, mirror degraded) (block checksums) Plex /aggr0/plex0 (online, normal, active, pool0) RAID group /aggr0/plex0/rg0 (normal) RAID Disk Device HA SHELF BAY CHAN Pool Type RPM Used (MB/blks) Phys (MB/blks) --------------------------------------------------------------------------------------- dparity SITEA03:5.16 0b 1 0 FC:B 0 FCAL 10000 272000/557056000 280104/573653840 parity SITEA02:5.32 0c 2 0 FC:A 0 FCAL 10000 272000/557056000 280104/573653840 data SITEA03:6.16 0d 1 0 FC:B 0 FCAL 10000 272000/557056000 280104/573653840 Plex /aggr0/plex1 (offline, failed, inactive, pool1) RAID group /aggr0/plex1/rg0 (partial) RAID Disk Device HA SHELF BAY CHAN Pool Type RPM Used (MB/blks) Phys (MB/blks) --------------------------------------------------------------------------------- dparity FAILED N/A 272000/557056000 parity FAILED N/A 272000/557056000 data FAILED N/A 272000/557056000 Raid group is missing 3 disks. FilerB>
---- FilerB> (takeover)> FilerB> (takeover)> aggr status -v Aggr State Status Options aggr0 online raid_dp, aggr root, diskroot, nosnap=off, mirror degraded raidtype=raid_dp, raidsize=16, ignore_inconsistent=off, snapmirrored=off, resyncsnaptime=60, fs_size_fixed=off, snapshot_autodelete=on, lost_write_protect=on Volumes: vol0 Plex /aggr0/plex0: online, normal, active RAID group /aggr0/plex0/rg0: normal Plex /aggr0/plex1: offline, failed, inactive FilerB/ FilerA> aggr status -v Aggr State Status Options aggr0 online raid_dp, aggr root, diskroot, nosnap=off, raidtype=raid_dp, raidsize=16, ignore_inconsistent=off, snapmirrored=off, resyncsnaptime=60, fs_size_fixed=off, snapshot_autodelete=on, lost_write_protect=on Volumes: vol0 Plex /aggr0/plex1: online, normal, active RAID group /aggr0/plex1/rg0: normal |
|
Failback
Procedure
|
1. After testing enable the ISL ports.
Login to Switch-Site-01and Switch-Site-02 switches
and enable the ports
The plexes which are in FilerA will
be out dated state, this needs to be synchronized manually.
FilerB/FilerA> aggr status -v Aggr State Status Options aggr0(1) failed raid_dp, aggr diskroot, raidtype=raid_dp, out-of-date raidsize=16, resyncsnaptime=60, lost_write_protect=off Volumes: Plex /aggr0(1)/plex0: offline, normal, out-of-date RAID group /aggr0(1)/plex0/rg0: normal
Plex /aggr0(1)/plex1: offline, failed, out-of-date
aggr0 online raid_dp, aggr root, diskroot, nosnap=off, raidtype=raid_dp, raidsize=16, ignore_inconsistent=off, snapmirrored=off, resyncsnaptime=60, fs_size_fixed=off, snapshot_autodelete=on, lost_write_protect=on Volumes: vol0 Plex /aggr0/plex1: online, normal, active RAID group /aggr0/plex1/rg0: normal
2. Launch aggregate mirror for each
one.
FilerB/FilerA> aggr mirror aggr0 –v aggr0(1)
3. Wait awhile for all aggregates to
synchronize.
FilerB/FilerA: raid.mirror.resync.done:notice]: /aggr0: resynchronization completed in 0:03.36 FilerB/FilerA> aggr mirror aggr0 -v aggr0(1) Aggr State Status Options aggr0 online raid_dp, aggr root, diskroot, nosnap=off, mirrored raidtype=raid_dp, raidsize=16, ignore_inconsistent=off, snapmirrored=off, resyncsnaptime=60, fs_size_fixed=off, snapshot_autodelete=on, lost_write_protect=on Volumes: vol0 Plex /aggr0/plex1: online, normal, active RAID group /aggr0/plex1/rg0: normal Plex /aggr0/plex3: online, normal, active RAID group /aggr0/plex3/rg0: normal
4.
Once the synchronization is done, power on the filer.
RLM FilerB> system power on RLM FilerB> system console Type Ctrl-D to exit. Boot Loader version 1.2.3 Copyright (C) 2000,2001,2002,2003 Broadcom Corporation. Portions Copyright (C) 2002-2006 NetApp Inc. NetApp Release 7.2.3: Sat Oct 20 17:27:02 PDT 2007 Copyright (c) 1992-2007 NetApp, Inc. Starting boot on Tue Feb 5 15:37:40 GMT 2008 Tue Feb 5 15:38:31 GMT [ses.giveback.wait:info]: Enclosure Services will be unavailable while waiting for giveback. Press Ctrl-C for Maintenance menu to release disks. Waiting for giveback
|
Mcafee Epolicy Orchestrator: How To Add Workstations Manually
| To add new machines and deploy mcafee antivirus manually through epolicy you will need to log into the epolicy console with admin credentials and also make sure the workstation you are trying to add/deploy to is switched on and logged into windows. First of all to add a new machine using the epolicy console you will need to click on Menu - Automation and then Server Tasks. If you look at the tasks one of them should say AD Discover, one of the options will be to Run click on this. |
 AD Discovery |
| Clicking on this will switch to the Server Tasks Log screen and show you whether its completed or failed, in most cases it will complete ok but in the rare case it fails click on Edit and make sure it is correctly configured to synchronise with all groups. If you are unsure please contact Ergo Technical Support who can double check this for you, making sure you have your support agreement number with you. Once this is done you can click on System Tree and you should see the new workstation and it should be unmanaged under Systems. To install the agent and deploy the antivirus you will need to Tick the box next to the workstation name and then click on Actions at the bottom of the screen. This will open a menu from here select Agent and then Deploy Agents. |
 Mcafee Deploy Agent |
| On the next screen enter the account details of an admin account then click on OK, this will try and deploy to the workstation in question. |
 Mcafee Deploy Agent Account Details |
| It may take a few minutes before the agents installs but it will appear in the task bar, once this is there it will pull down the antivirus program. Another way to manually deploy mcafee is to create an agent install package which you can run on any workstation as and when needed. The only thing that you will need to do to is move the workstation to the correct set from within mcafee. To create this click on System Tree and then System Tree Actions (bottom left corner). You will see an option for New Systems click on this. |
 Mcafee New Systems |
| Select the option to Create and Download Agent Installation Package leave everything else on default except the use credentials make sure it is unticked. Click on OK, then click on the Download File link named Framepkg and save it onto the D drive on the server. On the workstation that needs adding clicking on the Start button and then Run. Type in \\servername\d$ where server name is the name of the server usually f2t-server or server. Double click on the framepkg file to launch the agent install once this is completed it will pull the antivirus down. The workstation should now also appear in System Tree and may need moving to the correct set by ticking the tick box next to its name and then from the Actions Menu - Directory Management and Move Systems. You should be able to move it to the required set from here. |
Thursday, February 7, 2013
Updating Firmware on QUANTUM TAPE LIBRARY i40/80
Updating the Drive Firmware
Pre-Installation
.Save
the Library configuration
NOTE : Please save the configuration file as the current firmware version
NOTE : Please save the configuration file as the current firmware version
1.
Log on
the Scalar i40
web client interface to save the configuration file
2.
Click
Tools >Save/Restore Configuration
3.
Select
Save System Configuration and click apply
4.
You will be prompted to save the file, Save it as the
current library firmware version i.e.: 580
Assumptions :-
You have already downloaded the latest firmware and saved on the local machine from where you are accessing the library GUI console
Use this procedure to update the Scalar i40 library firmware on your system.
- Log on the Scalar i40 web client interface to update
the firmware.
- Click Tools
> Update Firmware.
- Click Browse to locate the downloaded
library firmware file (*.tgz) on your
computer's hard drive. Unzip fie if needed.
- Click Apply.
NOTE: The downloaded *.tgzfile should not be
unzipped since it will function correctly as is once the library has processed
this firmware upgrade file and has rebooted and re-inventoried the library.
When completed, the operator
panel will display the user login screen.

NETAPP LUN Configuring FCP Multipathing in RedHat Linux/CentOS
Configuring FCP Multipathing in RedHat Linux/CentOS
The task: Creating LUNs on a filer, discover them in RedHat Enterprise Linux or CentOS, and multipath them with the device-mapper-multipath (dm-multipath) mechanism.
Assumptions:
1. The FC HBA drivers are already installed and running.
2. This example is using two single-port QLogic HBAs.
3. The multipathing package is already installed - look for dm-multipath or device-mapper-multipath.
1. Connect the filer using the cabling rules documented in the guides.
2. Create a lun on the filer:
lun create -s -t linux /vol/volname/lunname
For example:
lun create -s 100g -t linux /vol/vol1/db1disk1.lun
3. Detect the relevant FC HBA initiator WWNs on the filer:
fcp show initiator
4. Configure the WWNs into an initiator group on the filer:
igroup create -f
5. Check if the Linux already recognizes the luns, it should:
[root@hostname /]# cat /proc/scsi/scsi
Attached devices:
Host: scsi0 Channel: 00 Id: 00 Lun: 00
Vendor: NETAPP Model: LUN Rev: 0.2
Type: Direct-Access ANSI SCSI revision: 04
Host: scsi0 Channel: 00 Id: 01 Lun: 00
Vendor: NETAPP Model: LUN Rev: 0.2
Type: Unknown ANSI SCSI revision: 04
Host: scsi1 Channel: 00 Id: 00 Lun: 00
Vendor: NETAPP Model: LUN Rev: 0.2
Type: Unknown ANSI SCSI revision: 04
Host: scsi1 Channel: 00 Id: 01 Lun: 00
Vendor: NETAPP Model: LUN Rev: 0.2
Type: Direct-Access ANSI SCSI revision: 04
6. Configure the multipath configuration file:
root@hostname /]# cat /etc/multipath.conf
## Use user friendly names, instead of using WWIDs as names.
defaults {
user_friendly_names yes
}
# Blacklist all devices by default. Remove this to enable multipathing
# on the default devices.
devnode_blacklist {
devnode "^(ram|raw|loop|fd|md|dm-|sr|scd|st)[0-9]*"
devnode "^hd[a-z]"
devnode "^cciss!c[0-9]d[0-9]*"
}
multipaths {
devices {
device {
vendor "NETAPP"
product "LUN"
path_grouping_policy multibus
features "1 queue_if_no_path"
path_checker readsector0
path_selector "round-robin 0"
failback immediate
no_path_retry queue
}
device {
vendor "NETAPP"
product "LUN"
path_grouping_policy multibus
features "1 queue_if_no_path"
path_checker readsector0
path_selector "round-robin 0"
failback immediate
no_path_retry queue
}
}
7. The following commands can be used to rescan the SCSI bus. Verify the paths using ls /proc/scsi/scsi:
echo "scsi-qlascan" > /proc/scsi/qla2xxx/0
echo "- - -" > /sys/class/scsi_host/host0/scan
echo "scsi-qlascan" > /proc/scsi/qla2xxx/1
echo "- - -" > /sys/class/scsi_host/host1/scan
echo "scsi add-single-device controller 0 0 1 ">/proc/scsi/scsi
echo "scsi add-single-device controller 0 0 1 ">/proc/scsi/scsi
8. As a result of the configuration file, there should be multipathing devices created already:
/dev/mapper/mpath0
9. Use the following commands to troubleshoot the multipathing setup:
multipath
multipath -d -l
10. Create a filesystem on top of the multipathing device. While it is possible to create partitions on the underlying luns, and then let the multipathing code discover the partitions (which seem to require a reboot, and will result in devices named /dev/mapper/mpath0p1 for example), it is not recommended and seems to be tricky at best. The steps to create the filesystem and mount it are simple:
mkfs -t ext3 /dev/mapper/mpath0
11. Mount the filesystem and check df:
[root@hostname ~]# df -k
Filesystem 1K-blocks Used Available Use% Mounted on
/dev/mapper/VolGroup00-LogVol00
413267016 2766160 389508040 1% /
/dev/cciss/c0d0p1 101086 23291 72576 25% /boot
none 8126884 0 8126884 0% /dev/shm
/dev/mapper/mpath0 103212320 93852 97875588 1% /db
/dev/mapper/mpath1 103212320 93852 97875588 1% /logs
Subscribe to:
Posts (Atom)